Are you interested in learning how to build your own aeroponic system and explore the wonders of growing plants without soil? Look no further! In this article, we’ll guide you through the process and provide you with the knowledge you need to successfully do aeroponics at home.
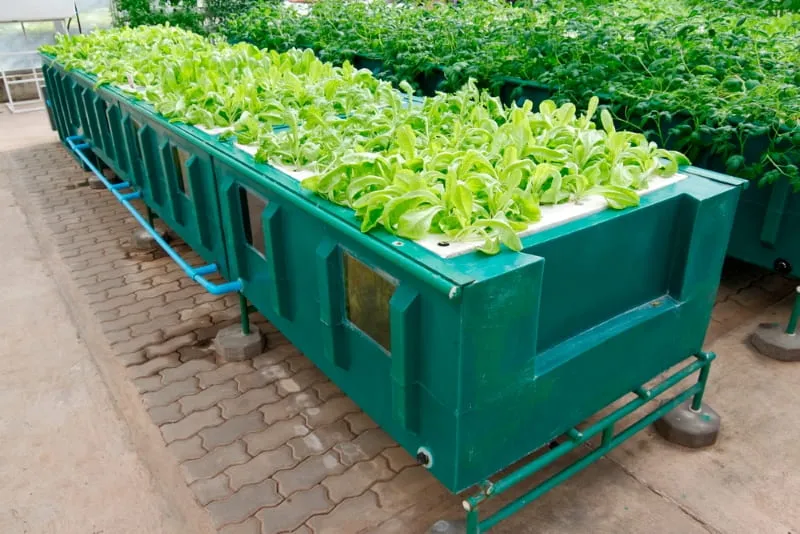
Aeroponic systems allow plants to grow in a nutrient-rich environment with their roots suspended in air, receiving all the necessary nutrients through a fine mist. This innovative technique leads to quicker, healthier growth for a majority of plant species. Building your own aeroponic system can not only save you money but also help you create the perfect system that caters to your growing needs and available space.
So, let’s dive into the world of aeroponics and discover how to create a thriving, personalized aeroponic system right in the comfort of your own home. With determination and a bit of guidance, you’ll be well on your way to mastering the art of aeroponic gardening and enjoying the numerous benefits it brings.
- Types of Aeroponic Systems
- Components of an Aeroponic System
- Assembling Your DIY Aeroponics System
- Selecting Droplet Size and Pressure
- Choosing the Right Growing Medium
- Nutrient Solution and Delivery
- Monitoring and Adjusting Your Aeroponic System
- Additional Tips and Best Practices for a Homemade Aeroponics System
Types of Aeroponic Systems
When you decide to build your own aeroponic system, it’s essential to understand the different types available. This helps you choose the right system for your needs and the plants you want to grow. In this section, we’ll discuss two common types of aeroponic systems: high pressure aeroponics and low pressure aeroponics. In our comprehensive guide on aeroponics, we also classify systems into horizontal or vertical systems.
High-pressure aeroponics is a more advanced and efficient system. It uses high pressure pumps to deliver the nutrient solution to the plant roots in the form of a fine mist. This method allows for faster absorption of nutrients and increased oxygen levels, promoting accelerated plant growth and higher yields. However, high pressure aeroponics systems can be more expensive and challenging to set up and maintain.
Low-pressure aeroponics is a more affordable and simpler version of the high-pressure system, and therefore an excellent starting point for beginners. It still relies on misting or spraying the roots with a nutrient solution but uses lower pressure pumps. This type of aeroponic system may not provide the same level of growth and yield as high pressure systems, but it’s more accessible for those who are new to aeroponics or have a limited budget.
As you explore aeroponic systems, consider your budget, experience, and the plants you wish to grow, as different systems may better suit specific plants or growth stages. With a clear understanding of the types of aeroponics systems, you can confidently assemble and maintain your own system for a successful and enjoyable growing experience.
Components of an Aeroponic System
When building your own aeroponic system, you’ll need a variety of components to ensure its success. In this section, we’ll go over the essential parts and how they function within the system.
Reservoir: Your plants will need a water source to receive their nutrients. A reservoir stores the nutrient-rich water, making it accessible for the pump to deliver it to the plants. A 5-gallon bucket or 30-gallon tub can serve as a suitable reservoir. If you have previously used a 5-gallon bucket to make a simple hydroponic system, then the same bucket will work well as an aeroponic reservoir.
Pump: The pump plays a vital role in your aeroponic system, as it circulates the nutrient solution from the reservoir to the plant roots. Diaphragm pumps are commonly used due to their efficiency and ability to maintain a consistent pressure. If you want to pick a good and reliable water pump for aeroponics, take a look at our top picks.
PVC pipes: PVC pipes are used to build the main structure of the aeroponic system. They serve as the conduits through which nutrient-rich water is circulated, reaching all plants in the system.
Poly risers: Poly risers connect different components of the system such as mist nozzles with the main PVC pipe network. This ensures an effective distribution of nutrients and water directly to the roots. They also act as plant spacers as their height can be adjusted according to plant size, and this provides adequate space for each plant’s roots to develop properly without encroaching on others’ spaces.
Misting Nozzle or Sprinkler: To nourish your plants, the nutrient solution must be delivered as a fine mist; this is where misting nozzles or sprinklers come in. These components break down the nutrient solution into tiny droplets, allowing the plants’ roots to optimally absorb the nutrients.
Net Pots and Growing Medium: Net pots are specially designed containers that hold your plants and a growing medium. The growing medium, such as coco coir or perlite, offers support for your plants while allowing their roots to access the aeroponic mist efficiently.
Oxygen: Oxygen is essential for healthy root development, and aeroponic systems excel in providing oxygen to the plant roots. However, it’s crucial to ensure air circulation and maintain oxygen levels, so consider including an air stone and air pump in your setup.
Electrical Solenoid and Pressure Switch: These components control the flow of water in your system, ensuring efficient distribution while minimizing waste. The electrical solenoid is responsible for opening and closing water flow, while the pressure switch automatically shuts off the pump when the desired pressure is reached.
Accumulator tank: An accumulator tank helps maintain consistent pressure within your aeroponic system, ensuring that misters and sprayers provide a steady and even distribution of nutrient solution.
Sprayers: In addition to misting nozzles, some aeroponic systems use sprayers to deliver the nutrient solution. Sprayers work similarly to misting nozzles but produce larger droplets, which can still be effectively absorbed by the plant roots.
Relay Timer Circuit: As plant roots require periods of dryness between mist cycles, a relay timer circuit ensures that the misting and solenoid operate at specific, controlled intervals. Optimal misting frequency depends on several factors so take the time to learn about them.
As you assemble your aeroponic system, keep these components in mind to create an effective and well-functioning environment for your plants.
Assembling Your DIY Aeroponics System
Getting started with at home aeroponics is both exciting and rewarding. In this section, we will walk you through the process of assembling a DIY aeroponics system using readily available materials.
First, gather the necessary materials for your homemade aeroponics system. You will need a 5-gallon bucket, PVC pipes, buckets, misting nozzles, hydroponic net pots, and a power outage backup system (for emergency situations).
Begin by preparing your PVC pipes and buckets. Measure and cut the PVC pipes to fit your designated growing space. Drill holes in the PVC pipes and buckets where you plan to place the hydroponic net pots. Be mindful of the spacing and use poly risers to ensure optimal growth for your plants.
Next, create your aeroponic growing system by connecting the PVC pipes and buckets. You can use T-fittings and elbow connectors to achieve the desired shape of your system. Attach the misting nozzles or sprinkler heads to the PVC pipes using poly risers to ensure even distribution of nutrient-enriched water droplets throughout the root zone of your plants. Select misting nozzles with the appropriate micron size to effectively deliver nutrients to the plant roots.
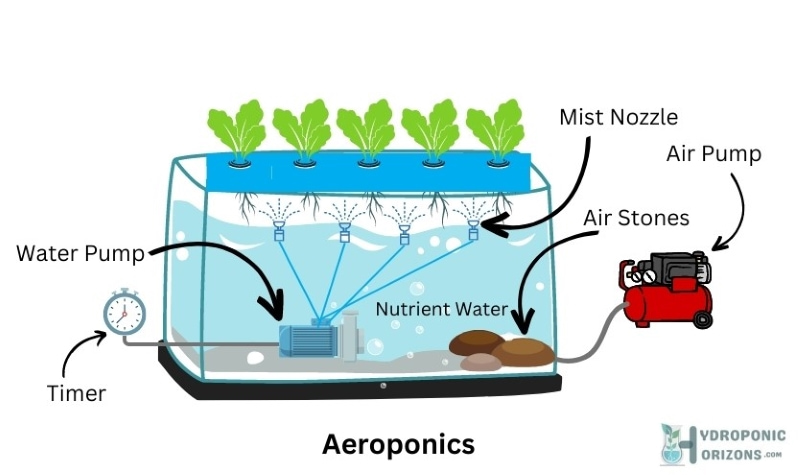
Now it’s time to set up the nutrient delivery mechanism. Fill the 5-gallon bucket with water and add the proper nutrient levels for your selected plants. Make sure to monitor these levels regularly to maintain healthy growth. If you use tap water, you might need to remove chlorine, which can be done by letting the water sit for 24 hours or using a de-chlorinating agent.
Install the hydroponic net pots in the drilled holes of the PVC pipes and buckets. Fill the net pots with grow media, such as coco coir, perlite, or clay pebbles, to support your plants. Plant your herbs, seedlings, or other desired plants in the net pots, ensuring their roots are well exposed to the mist.
Finally, connect your at home aeroponics system to a power source and add in a backup system in case of a power outage. This will ensure that your plants continue receiving the necessary nutrients even during unexpected circumstances.
By following these steps, you are setting yourself up for success with your do-it-yourself aeroponic system. Enjoy watching your plants thrive and produce bountiful yields in their new environment.
Selecting Droplet Size and Pressure
When building your own aeroponic system, selecting the appropriate droplet size and pressure is crucial for the success of your plants’ growth. Understanding the difference between low and high pressure aeroponics and their respective droplet sizes will help you make informed decisions for your DIY project.
DIY Low Pressure Aeroponics
For a low pressure aeroponics system, the droplet size tends to be larger than in a high pressure system. In this case, droplet sizes usually range from hundreds to thousands of microns. These larger droplets help to provide adequate coverage and nutrients to your plants in a low pressure environment.
To build a low pressure aeroponics system, consider the following:
- Use a standard submersible pump with a pressure rating of 20-30 psi.
- Select spray nozzles that can generate droplet sizes of hundreds to thousands of microns.
- Ensure proper drainage and aeration in your system to prevent stagnant water and root rot.
DIY High Pressure Aeroponics
In contrast, a high pressure aeroponics system requires smaller droplet sizes to achieve optimal growth and nutrient absorption. For most high pressure applications, choose a full-cone nozzle pattern which typically generates droplet sizes in the range of sub-microns to a few hundred microns. These smaller droplets allow for better nutrient uptake by plant roots and can lead to improved growth rates.
To build a high pressure aeroponics system, consider the following:
- Invest in a high pressure pump with a pressure rating of 60-100 psi.
- Select full-cone nozzle patterns that can generate droplet sizes of sub-microns to a few hundred microns.
- Use additional components such as an accumulator tank, solenoid, and pressure switch to maintain appropriate pressure levels in the system.
By taking droplet size and pressure into account when building your aeroponic system, you can ensure the success of your plants and enjoy the benefits of this soilless gardening method.
Choosing the Right Growing Medium
When building your own aeroponic system, selecting the appropriate growing medium is crucial for promoting healthy plant growth. In aeroponics, plants are grown in the absence of soil, with their roots suspended in the air. This allows for more rapid and healthier development. Unlike traditional soil-based growing methods, aeroponic systems do not use a conventional growing medium. Instead, they rely on air and nutrient-rich water mist to support plant growth.
However, you still need to use a medium to anchor the plants in place and provide initial stability. In this context, a growing medium can be any inert, porous, and water-retaining substance. Some examples of suitable growing mediums for aeroponics include:
- Rockwool: Made from molten basaltic rock, rockwool is spun into fibers and formed into cubes or slabs. It has excellent water retention and aeration properties, making it an ideal choice for aeroponic systems. Make sure to soak rockwool in pH-adjusted water before planting, as it can be slightly alkaline.
- Coco coir: Derived from coconut husks, this lightweight, organic, and sustainable medium is an excellent alternative to peat moss. Coco coir has good water retention, aeration, and provides some essential nutrients for plant growth. However, be aware that coco coir can rapidly decompose in high humidity environments, which might not be ideal for long-term use in aeroponic systems.
- Perlite: This volcanic rock expands under high heat and forms a lightweight, porous medium that provides excellent aeration and drainage. Perlite can be used alone or mixed with other mediums such as coco coir to provide additional support and moisture retention.
- Clay pebbles: Also known as expanded clay pellets or hydroton, these porous, lightweight, and reusable clay balls provide excellent aeration and drainage. Clay pebbles can be used to support plants in net pots and allow the roots to easily access the nutrient-rich mist in the aeroponic system.
Remember, the primary role of the growing medium in an aeroponic system is to provide support and stability for the plants. With adequate exposure to the nutrient-rich water mist and proper aeration, your plants should thrive in their new environment.
Nutrient Solution and Delivery
When building your own aeroponic system, nutrient solution and delivery are key factors to ensure healthy plant growth. The nutrient-rich solution reaches the plant roots directly, allowing efficient absorption and access to plentiful oxygen and aeration. This helps to manage carbon dioxide levels and prevent plant diseases caused by pathogens.
To create an effective nutrient solution, consider the specific needs of the plants you intend to grow. Some plants, such as vegetables and greens, can thrive in an aeroponic system, offering bountiful yields. The nutrient solution should be well-balanced and formulated to meet the needs of your chosen plants.
An indoor aeroponic system uses less water and nutrients due to the plant roots being sprayed at intervals with a precise mist. This spray mist allows for the most efficient nutrient uptake through osmosis. Make sure to maintain an optimal nutrient level with minimal excess, as this can promote root growth and reduce the amount of runoff or evaporation.
To deliver the nutrient solution to your plants, you’ll need:
- A reservoir to hold the nutrient solution
- A nutrient pump
- Nozzles for the mister
- Tubing to transport the nutrient solution from the pump to the grow chamber
- Baskets to hold plants
- A growing chamber for the roots
- A watertight container for the grow chamber
- A timer to control the pump
Remember to also keep an eye on carbon dioxide levels, as this plays a crucial role in plant growth. If you’re growing in a sealed environment, you may need to supplement CO2 to optimize your plants’ growth rate.
Monitoring and Adjusting Your Aeroponic System
Keeping an eye on your DIY aeroponics growing system is crucial for its success. Regular monitoring allows you to spot issues early, adjust nutrient levels, and maintain plant health. This will ultimately give your plants the optimal environment to grow healthy and strong.
To start, be sure to check the pH levels of your nutrient-rich solution regularly, ideally once a week. This ensures that it remains within the optimal range of 5.5-6.5. If you notice the pH levels are outside of this range, you can adjust them by either adding pH up or pH down solutions. Maintaining the right pH level is important for plant nutrient absorption and overall health.
Next, monitor the water temperature in your system. The optimal water temperature for most plants is between 65 and 75 degrees Fahrenheit (18-24 degrees Celsius). If the water temperature is too high, there is a risk of diseases like root rot. To regulate the water temperature, you can either add a water chiller or heater as necessary.
Additionally, ensure that your poly riser—the component responsible for delivering the nutrient solution to the roots—operates efficiently. Regularly inspect it for clogs and wear, and clean or replace any damaged parts to ensure that it continues to provide a consistent flow of the nutrient solution.
Another essential aspect of monitoring your DIY aeroponics growing system is keeping an eye on plant cloning. The process of cloning in aeroponics involves cutting a piece of an existing plant and placing it into the aeroponic system to grow new roots. In this process, ensure that your cloners are clean and sterile, and use a suitable rooting gel or hormone to promote healthy roots.
Remember to also regularly check the overall system for leaks, secure connections, and proper functioning of pumps and timers. Detecting and fixing small issues early will prevent them from becoming major problems and will help you maintain a thriving aeroponic garden.
By consistently monitoring and adjusting your aeroponic system, you can provide your plants with the ideal environment to grow. Stay diligent with your checks and watch your plants prosper in their nutrient-rich, water-efficient growing space.
Additional Tips and Best Practices for a Homemade Aeroponics System
Building your own aeroponics system can be both rewarding and cost-effective. With a little technical expertise and some essential components, you’ll be on your way to growing healthy, bountiful plants. Keep these tips in mind as you set up your homemade aeroponics system:
- Choose the right materials: Use a food-grade bucket as your reservoir. Non-food-grade containers may release harmful chemicals into the water, negatively affecting your plants.
- Pick the right pump: A hydroponics pump will ensure proper circulation of the nutrient solution. Make sure to select a pump with enough capacity to handle the volume of your system.
- Set up an electrical timer: Using an indoor/outdoor electrical timer will help maintain the ideal system, ensuring that your plants receive consistent misting and nutrients. Set the timer to periodically turn the pump on and off, automating the entire process.
Proper nozzle selection: Select a plastic threaded sprinkler head for misting the roots of your plants. These nozzles are designed for optimal water distribution, providing your plants with the coverage they need.
- Don’t forget safety: When working with your system, wear safety glasses to protect your eyes from any splashing nutrient solution or debris.
- Monitor and adjust: Regularly check pH levels, temperature, and humidity in your homemade aeroponic system. Adjust as needed to maintain the ideal system for growth. Consider incorporating sensors and controllers for a more automated approach.
- Stay committed: Setting up your very own aeroponics system requires dedication and attention to detail. Stick with it to see your plants flourish and enjoy the fruits of your labor.


