Hydroponic gardening has become increasingly popular in recent years, as it allows for greater control over growing conditions and often yields more bountiful harvests. One simple and budget-friendly way to get started with hydroponics is by creating a 5-gallon bucket system. This DIY project is perfect for beginners and experienced gardeners alike, as it requires minimal materials and can easily be customized to suit your specific needs.
There are several methods for constructing a 5-gallon bucket hydroponic system, such as the Kratky Method and Deep Water Culture (DWC). Both of these methods involve growing plants in nutrient-rich water solutions without the need for soil. This enables plants to receive a constant supply of vital nutrients, leading to faster growth and healthier plants overall. In addition, hydroponic systems using 5-gallon buckets are versatile, portable, and require little maintenance, making them an ideal choice for both urban and rural gardeners.
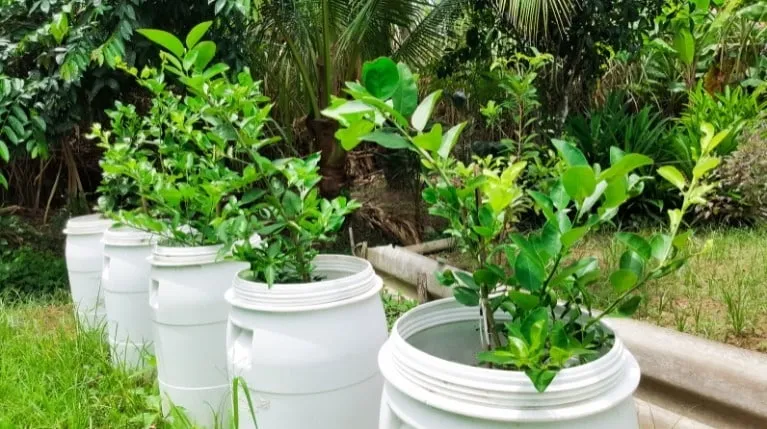
In this article, we’ll guide you through the process and show you how to build a deep water culture system using a 5-gallon bucket. We’ll cover the primary methods for constructing these systems, the materials you’ll need, and some tips for optimizing your hydroponic garden. With a bit of planning and creativity, you’ll soon be on your way to enjoying the many benefits of hydroponic gardening.
5-Gallon Bucket Hydroponic System DIY Overview
How To Make A Homemade Hydroponic System Step By Step Using Deep Water Culture
We’re excited to help you build your very own 5-gallon bucket hydroponic system using the Deep Water Culture (DWC) method. This simple and budget-friendly method is not only a great DIY project, but also an effective way to grow plants hydroponically. Here’s a step-by-step guide to get you started and we’ll go into each step in detail too:
Related: If you’re interested in other variations of DWC, we have this deep water culture guide with designs for them. If you want to learn the principles behind it, we explain how the DWC method works.
Materials and Tools
We are now going to discuss the various materials and tools you will need to construct your DIY hydroponic 5-gallon bucket.
Bucket and Lid
To get started, you’ll need a 5-gallon bucket and a matching lid. It’s best to use a dark, opaque bucket to prevent algae growth and ensure your plant roots remain in darkness. Buckets can be found at most hardware stores or online.
Air Pump and Accessories
Moving on to the air pump and accessories, we’ll need an air pump, air stone, and air hose. The air pump is essential for maintaining oxygen levels in the water while the air stone helps to diffuse the air evenly. The air hose connects the pump to the air stone.
Net Cups and Grow Medium
Our hydroponic bucket system also requires a net cup and a grow medium. A net cup is a plastic or mesh cup that holds the plant in place while allowing its roots to grow freely in the nutrient solution. Hydroton is a popular choice for the grow medium in this system, as it is an expanded clay that provides excellent oxygenation and stability for the roots. You could choose an alternative medium like perlite, vermiculite, or coconut coir if you prefer.
Nutrient Solutions and Water
We’ll need a well-balanced nutrient solution to provide essential minerals and nutrients for our plant growth. A pH test kit is helpful for maintaining the correct balance in our system. The water is, of course, going to be the primary base for our hydroponic system and should be changed every two to three weeks. Using clean, filtered water is key to success.
Drill and Other Tools
Lastly, we will require a drill with a hole saw attachment for creating openings in the bucket lid and a wrench for tightening the fittings of our air pump and tubing system. A knife or sharp scissors may come in handy for trimming the tubing or making additional adjustments.
In summary, for our DIY hydroponic 5-gallon bucket, we will need:
- 5-gallon bucket and lid
- Air pump, air stone, and air hose
- Net cup filled with a grow medium (e.g., hydroton, perlite, vermiculite, or coconut coir)
- Nutrient solution and pH test kit
- Water
- Drill with hole cutter attachment and wrench
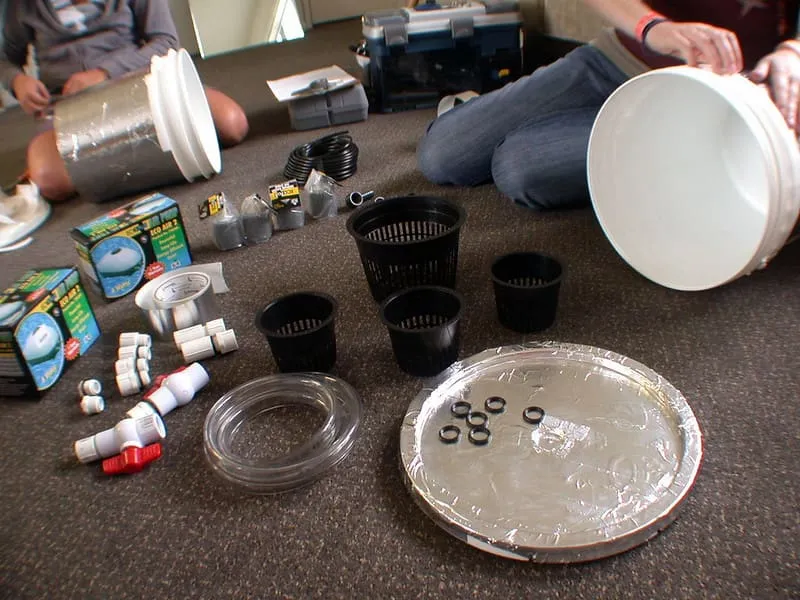
With these materials and tools, you’ll be set to create a successful hydroponic system in a 5-gallon bucket.
Related: How does an aeroponic tower garden work? Find out now!
Preparation
Before setting up your single bucket hydroponic system, let’s prepare the necessary components. In this section, we’ll guide you through drilling holes for net cups, creating air bubbles, and measuring and preparing the nutrient solution.
Drilling Holes for Net Cups
First, let’s prepare the 5-gallon bucket by drilling holes for the net cups. These holes will hold the net cups in place and allow the plant roots to access the nutrient solution inside the bucket. Here’s what we need to do:
- Measure the diameter of your net cups and choose a hole saw size slightly larger than the net cup diameter.
- Mark where you want to place the net cups on the lid of the bucket. Be sure to space them far enough apart to accommodate the growth of each plant fully.
- Attach the appropriately sized hole saw to your drill, and carefully drill the holes on the marked spots.
Creating Air Bubbles
To provide oxygen to our plants’ roots, we need to set up an air pump and air stone within the bucket. Follow these simple steps:
- Choose an appropriate air pump and airstone size for your bucket. We recommend a small air pump and a 4-inch airstone for a 5-gallon bucket. Ensure the pump has sufficient capacity to deliver enough air to meet the needs of your plants. Opt for a quiet one if noise is a concern, especially if your system is indoors. It should be a reliable and well-reviewed air pump to ensure longevity and optimal performance.
- Drill a small hole in the side of the bucket near the top, just large enough for the air tubing to pass through.
- Insert one end of the air tubing through the hole and attach it to the airstone. Place the air stone at the bottom of the bucket. Position it away from the net pots or cups to prevent direct contact with the plant roots.
- Connect the other end of the tubing to the air pump and ensure it’s securely fastened. To prevent any movement or accidental disconnection, use tubing clips or zip ties to secure the tubing to the bucket or the system’s frame.
- The air pump should sit outside the bucket. When the system is in operation, it will produce air bubbles that dissolve oxygen into the nutrient solution.
- After completing the installation, it’s crucial to test the air pump and tubing to ensure everything is functioning correctly. Turn on the air pump and listen for any abnormal sounds or vibrations. Observe the air stone for a steady stream of fine bubbles being released into the nutrient solution. Inspect the tubing connections for any signs of air leaks. If necessary, adjust or tighten the connections to eliminate leaks.
Measuring and Preparing Nutrient Solution
Lastly, let’s talk about measuring and preparing the nutrient solution. We’ll be using a mix of magnesium sulfate, calcium nitrate, and Epsom salts, as they are essential for plant growth. Follow these steps to prepare the solution:
- Fill the 5-gallon bucket with about 2 gallons of water, leaving at least six inches from the top.
- Weigh out the following amounts of nutrients:
- Calcium nitrate: 5 grams
- Magnesium sulfate (Epsom salts): 2 grams
- Dissolve the calcium nitrate and magnesium sulfate separately in small amounts of water, then mix them initially into about 1.5 gallons of water before adding the whole solution into the bucket. Be sure to stir the solution thoroughly.
Remember, measuring and preparing the nutrient solution correctly is crucial for the health and growth of your plants. Your 5-gallon bucket hydroponic system is now ready for planting!
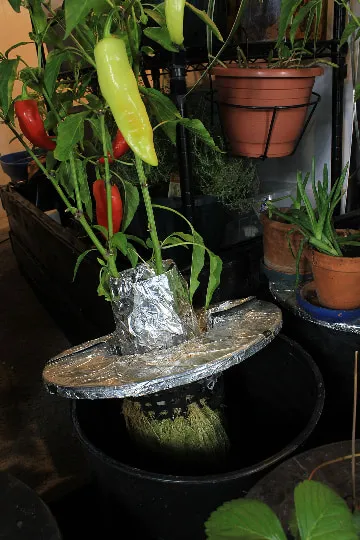
DWC Hydroponic System Kit
If all this seems too much work you can get a complete DWC 5 gallon bucket kit that has all necessary components included.
Hydrofarm RS5GALSYS Root Spa Deep Water Culture Bucket System
- Simple and efficient 5-gallon bucket system for growing large plants
- Pumping raw air into nutrient solution without air stones is cost-effective and highly effective
- Water tight seal with no leaks
- 8″ bucket basket for growing medium
- Multi-purpose air hose delivers air to the bottom of the bucket
- Air pump oxygenates water to encourage root growth
- ½” grommet fitting and ½” elbow fitting
- ¼” black tubing
- Available in single, 4-bucket, and 8-bucket systems
Plant Selection
When it comes to selecting plants for our 5-gallon bucket hydroponic system, we must consider the type of plants that will thrive in this environment. In this section, we’ll discuss some vegetables and fruits that are suitable for growing in a hydroponic system like ours.
Vegetables
A wide variety of vegetables can grow well in our hydroponic system. Here are some examples:
- Tomatoes: Tomatoes are a popular choice for hydroponic systems due to their high yield and relatively short growing period. Make sure to choose a suitable variety, as some varieties, like cherry tomatoes, grow better in hydroponic systems.
- Cucumbers: These plants are excellent for hydroponics, as they require a lot of water. Be sure to choose a climbing variety, like the English cucumber, which grows well vertically.
- Lettuce: Lettuce is a fantastic choice for beginners because it grows quickly and requires minimal space. Opt for loose-leaf varieties, such as romaine, for the best results.
Fruits
Growing fruits hydroponically can be a bit more challenging than vegetables, but it’s entirely possible with the right selection. Some fruits that can work well in our 5-gallon bucket system include:
- Melons: Melons like cantaloupe and honeydew can be trained to grow up a trellis, making them suitable for a hydroponic system. Just remember to provide adequate support for the growing fruit.
- Strawberries: These small fruits require minimal space and grow well in hydroponic systems. They can be grown from seeds or transplants.
Unfortunately, some larger fruit plants like watermelons and pumpkins may not be suitable for our 5-gallon bucket hydroponic system due to their size and water requirements. However, there are many other vegetables and fruits to choose from, so don’t let that limit your creativity in selecting your plants. Remember to always research any new plant you want to grow to ensure it’s compatible with your hydroponic system.
Planting Seeds or Seedlings
Proper planting techniques are essential for establishing healthy plants and maximizing your hydroponic gardening success. Let’s delve into the following steps to ensure a successful planting process:
- Selecting Seeds or Seedlings: Choosing the right seeds or seedlings is a crucial first step in your hydroponic journey. Consider the following factors when making your selection:
- Plant variety: Opt for plants that thrive in hydroponic environments and are suitable for the space available in your 5-gallon bucket system.
- Seed quality: If starting from seeds, ensure they are fresh, viable, and obtained from reputable sources.
- Seedling health: If using seedlings, select healthy ones with sturdy stems, vibrant leaves, and no signs of pests or diseases.
- Preparing the Growing Medium: The choice of growing medium will depend on your preferences and the specific requirements of the plants you intend to grow. Common options include:
- Perlite: Provides good drainage and aeration for the roots.
- Coconut coir: Retains moisture well and provides excellent root support.
- Rockwool cubes: Ideal for germinating seeds and providing a stable medium for seedlings.
3. Placing Seeds or Seedlings in the System: When placing seeds or seedlings in the 5-gallon bucket hydroponic system, follow these steps:
- Create a hole in the growing medium within the net pot or cup, ensuring it is deep enough to accommodate the roots.
- For seeds, carefully place one or two seeds in each hole. If using seedlings, position them in the hole, ensuring the roots are well-covered by the growing medium.
- Gently firm the growing medium around the roots to provide stability and contact.
Maintenance
Place the 5-gallon bucket system in an area with adequate lighting, whether it’s natural sunlight or artificial grow lights. Regular maintenance is crucial to keep the system running smoothly. This includes checking pH and EC levels, topping up the nutrient solution, cleaning the air stone and tubing, and replacing the growing medium as needed. Regularly monitor plant health and address any signs of nutrient deficiencies, pests, or diseases promptly.
Monitoring and Adjusting PH Levels
Let’s dive into the following steps to ensure a well-balanced pH environment for your hydroponic plants:
- Understanding pH and Its Significance: pH is a measurement of the acidity or alkalinity of a solution, and it directly affects nutrient availability to plants. In hydroponics, most plants thrive within a pH range of 5.5 to 6.5. Here’s why pH is important in your hydroponic system:
- pH affects nutrient solubility: Nutrients are absorbed by the roots in their ionized form, and pH influences their solubility in the nutrient solution.
- pH impacts nutrient uptake: A pH level that is too high or too low can hinder the uptake of specific nutrients, leading to deficiencies or toxicities.
- pH affects microbial activity: Beneficial microorganisms that support plant health have specific pH preferences, and maintaining the right pH range encourages their growth.
- Regular pH Monitoring: To ensure your hydroponic system maintains the optimal pH level, follow these monitoring guidelines:
- Use a pH testing kit or a digital pH meter to measure the pH of the nutrient solution.
- Test the pH regularly, ideally on a daily basis or at least a few times a week, to identify any fluctuations or deviations.
- Take measurements at the same time each day for consistency, as pH levels can fluctuate throughout the day due to plant activity.
- Adjusting pH Levels: If you find that the pH of your hydroponic system is outside the desired range, it’s essential to make adjustments. Here are effective methods for pH adjustment:
- pH Up and pH Down solutions: These commercially available products can be added to the nutrient solution to raise or lower pH levels, respectively. Follow the instructions provided by the manufacturer for accurate dosage.
- Citric acid or vinegar (for pH down): These natural acids can be used in small quantities to lower pH levels. Start with small doses and gradually adjust as needed.
- Baking soda (for pH up): Baking soda can be used sparingly to increase pH levels. Add small amounts at a time and monitor the pH closely to avoid overshooting the desired range.
- Pre-mixed nutrient solutions: Some nutrient solutions are formulated to maintain a specific pH range. Using these solutions can help stabilize pH levels without requiring frequent adjustments.
- pH Maintenance Tips: To maintain stable pH levels in your hydroponic system, consider the following tips:
- Adjust pH before adding nutrients: Make pH adjustments before adding any nutrient solutions to ensure accurate readings.
- Allow time for pH stabilization: After making adjustments, allow the system some time to stabilize before retesting and making additional changes.
- Monitor pH after adding nutrients: Nutrient solutions can influence pH levels, so it’s crucial to check the pH again after adding fresh nutrient solutions.
- Avoid sudden pH changes: Gradual adjustments are preferable to avoid shocking the plants. Aim for incremental changes until the desired pH range is achieved.
Cleaning and Changing Nutrient Solution
Proper cleaning and regular changing of the nutrient solution in your single bucket hydroponic system are essential for maintaining healthy plants and maximizing growth.
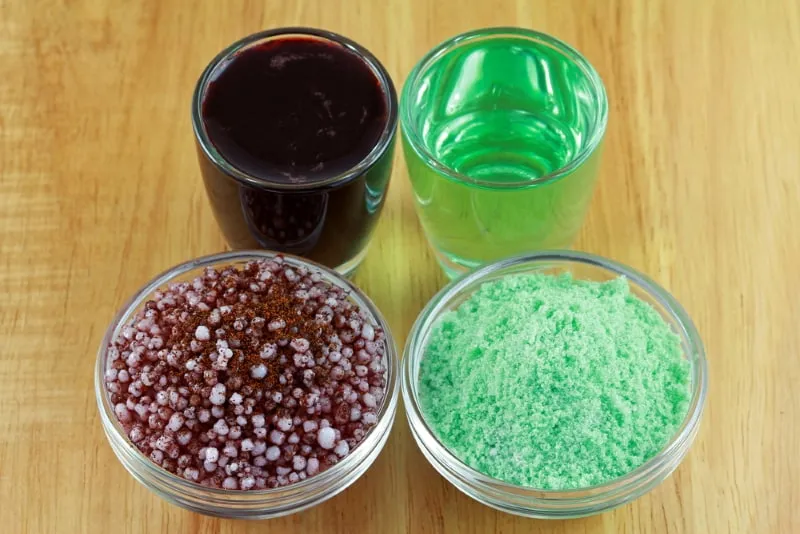
- Importance of Cleaning and Changing Nutrient Solution: Cleaning and changing the nutrient solution offer several benefits for your hydroponic system:
- Removes accumulated salts and residues: Over time, salts and residues from nutrient solutions can build up, potentially leading to nutrient imbalances and negatively impacting plant health.
- Prevents the growth of algae and pathogens: Stagnant nutrient solutions can provide an ideal environment for algae growth and the proliferation of harmful pathogens.
- Maintains optimal nutrient levels: Regular changes ensure that the nutrient solution remains fresh and provides the necessary elements for plant growth.
- Cleaning the 5-Gallon Bucket: Before changing the nutrient solution, it’s important to clean the bucket to remove any debris or residue. Follow these steps:
- Empty the existing nutrient solution from the bucket.
- Rinse the bucket thoroughly with clean water to remove any remaining solution.
- Use a mild detergent or a solution of hydrogen peroxide and water to scrub the inside of the bucket, paying attention to the walls and bottom.
- Rinse the bucket again with clean water to remove any cleaning agents.
- Disposing of the old nutrient solution: Proper disposal of the old nutrient solution is essential to avoid contaminating the environment. Consider the following methods:
- Dilute and use for outdoor plants: If the nutrient solution is still relatively fresh, you can dilute it with water and use it to water outdoor plants in your garden.
- Flush down a drain (if allowed): If permitted by local regulations, you can safely dispose of the old nutrient solution by flushing it down a drain connected to the sewage system. Be sure to check your local regulations regarding the proper disposal of nutrient solutions, as guidelines may vary.
- Mixing a Fresh Nutrient Solution: Once the bucket is clean and the old nutrient solution has been disposed of, it’s time to prepare a fresh nutrient solution for your plants. Consider the following steps:
- Follow the manufacturer’s instructions for the specific hydroponic nutrient solution you are using.
- Measure and mix the appropriate amount of nutrients in clean water, ensuring proper ratios and concentrations.
- Stir the solution well to ensure thorough mixing of the nutrients.
- Check the pH level of the new solution and adjust it if necessary to the desired range for your plants.
- Adding the Fresh Nutrient Solution: After preparing the fresh nutrient solution, it’s time to add it to the 5-gallon bucket hydroponic system. Follow these steps:
- Fill the clean bucket with the fresh nutrient solution, ensuring it reaches the appropriate level for the roots of your plants.
- Check the pH of the solution again after adding the nutrients to ensure it falls within the desired range.
- Adjust the pH if necessary to maintain optimal levels for nutrient uptake.
Additional Tips
Using Grow Lights
When setting up a 5-gallon bucket hydroponic system, using appropriate grow lights is crucial to provide the necessary light spectrum and intensity for your plants’ growth. Here’s how to effectively use grow lights in your hydroponic setup:
- Choosing the Right Grow Lights: Selecting the appropriate grow lights is essential for providing your plants with the right spectrum and intensity. Consider the following options:
- LED grow lights: Highly energy-efficient and versatile, LED lights offer a wide range of spectrums suitable for different growth stages. Look for full-spectrum LED lights designed specifically for plant growth.
- Fluorescent grow lights: Compact fluorescent lights (CFL) and high-output T5 fluorescent lights are popular choices for small-scale hydroponic systems. They are more affordable and emit less heat compared to other options.
- Positioning the Grow Lights: Proper positioning of grow lights ensures even light distribution and maximizes plant exposure. Consider these tips:
- Hang the lights at an appropriate distance above the plants. The distance will vary depending on the light type and intensity. Refer to the manufacturer’s recommendations for specific guidelines.
- Adjust the height of the lights as the plants grow to maintain the ideal distance and prevent light burn or insufficient light exposure.
- Use reflective materials, such as Mylar or white paint, on the walls of your grow area to enhance light reflection and increase overall light coverage.
- Determining Light Duration: Providing the right duration of light exposure is crucial for plant growth and development. Consider the following recommendations:
- Seedling stage: Start with 14-16 hours of light per day to promote healthy seedling growth.
- Vegetative stage: Increase the light duration to 18-20 hours per day to encourage foliage growth and root development.
- Flowering stage: Adjust the light cycle to 12 hours of light and 12 hours of darkness to stimulate flowering and fruiting.
- Monitoring Light Intensity: Regularly monitoring light intensity ensures that your plants receive the optimal amount of light. Consider the following tips:
- Use a light meter or a smartphone app to measure the light intensity at plant level. Aim for the recommended intensity range for your specific plant species.
- Adjust the position or height of the lights if the intensity is too high or too low. Maintaining the optimal light intensity throughout the growth stages is crucial for plant health and productivity.
- Providing Supplemental Lighting: In some cases, natural light may be insufficient for optimal plant growth. Consider supplementing with artificial lighting options:
- Use a timer to provide supplemental lighting during cloudy days or periods of limited sunlight.
- Supplemental lighting can also be used to extend the day length during shorter daylight seasons, ensuring consistent growth.
Providing Adequate Aeration
Proper aeration is vital for the success of a single bucket hydroponic system as it ensures the delivery of oxygen to the plant roots, prevents root rot and promotes healthy growth. Follow these guidelines to optimize oxygen levels and enhance plant development:
- Selecting the Right Aeration Method: Choosing the appropriate aeration method is crucial for maintaining optimal oxygen levels in your hydroponic system. Consider the following options:
- Air stones: Air stones connected to an air pump release bubbles into the nutrient solution, ensuring efficient oxygen distribution.
- Air diffusers: Similar to air stones, air diffusers provide oxygenation by dispersing bubbles into the nutrient solution. They offer a more even distribution of finer bubbles compared to air stones but they’re more expensive than air stones.
- Venturi system: A venturi or falling water system utilizes the pressure differential created by the flow of water to draw in air and oxygenate the nutrient solution.
2. Proper Placement of Aeration Equipment: Correct placement of aeration equipment ensures optimal oxygenation throughout the hydroponic system. Follow these placement guidelines:
- Position air stones or diffusers near the bottom of the bucket to allow oxygen to rise through the nutrient solution and reach the roots effectively.
- Distribute multiple air stones or diffusers evenly within the bucket to ensure uniform oxygen distribution.
- Place the air pump outside the bucket or in a separate compartment to prevent water damage and ensure proper airflow.
- Maintaining Aeration System: Regular maintenance of the aeration system helps ensure its efficiency and longevity. Consider the following maintenance tips:
- Clean air stones or diffusers regularly to remove any accumulated debris or mineral deposits that can hinder airflow. Soaking them in a solution of hydrogen peroxide and water can help dissolve stubborn residue.
- Check the air pump regularly to ensure it is functioning properly. Clean or replace air filters as needed to maintain optimal airflow.
- Inspect the tubing for any leaks or blockages, and replace damaged or worn-out sections to maintain consistent airflow.
- Oxygenating the Nutrient Solution: In addition to aeration equipment, you can enhance oxygenation in the nutrient solution using the following methods:
- Implement a recirculating system: A recirculating system continuously circulates the nutrient solution, enhancing oxygenation. This can be achieved using a pump and appropriate plumbing.
- Incorporate a water chiller: Cooler water holds more dissolved oxygen. Using a water chiller can help maintain lower temperatures and increase oxygen levels in the nutrient solution.


