Hydroponic gardening has revolutionized the way we grow plants, offering an increasingly popular option for both small and large-scale projects. One highly beneficial and versatile method called the Dutch Bucket System, or Bato Bucket method, has gained attention for its ability to accommodate various plant types, particularly large fruiting plants.
You might find Dutch Bucket system hydroponics appealing due to its space-saving design and flexibility in layout. This technique can fit comfortably in small areas like hobby greenhouses while also being easily scalable to suit your gardening needs. The system’s unique approach to hydroponic growing relies on water and nutrient solutions instead of soil, providing your plants with the essential nutrients for healthy, fruitful growth.
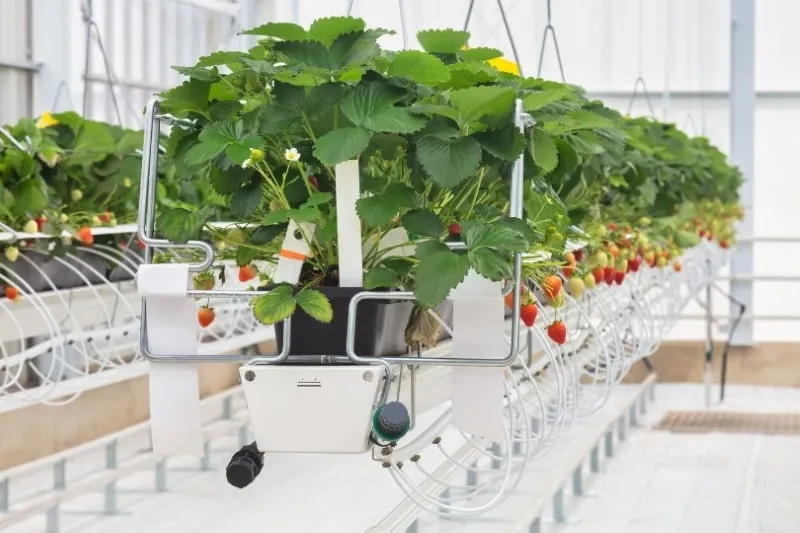
As you embark on your hydroponic gardening journey, the Dutch Bucket System offers an efficient and customizable option for maximizing plant yield in minimal spaces. Whether you’re a hobbyist or a professional grower, this method can be tailored to fit your specific requirements and help you achieve impressive results.
Dutch Bucket System Hydroponics Basics
What is a Dutch Bucket (Bato Bucket)?
A Dutch Bucket, also known as a Bato Bucket, is a type of hydroponic growing container designed for cultivating large fruiting plants like tomatoes, peppers, and cucumbers. These buckets are an excellent choice for gardeners who want to make the most of their available space and enjoy the benefits of hydroponics.
How Does A Dutch Bucket System Work?
A Dutch Bucket system consists of the following components:
- Buckets: These are individual containers that hold your plants and growing medium, such as perlite or coco coir.
- Drip System: This is a network of tubes and emitters that supply water and nutrients directly to the plant roots.
- Drainage System: This collects excess water from each bucket, preventing oversaturation and root rot.
- Water Reservoir: A tank that holds the nutrient-rich water solution for the system.
The Dutch Bucket system operates using a recirculating drip system, which means that water is pumped from the reservoir tank and delivered to each bucket’s plant roots. The water then drains out of the buckets and returns to the reservoir, allowing for efficient use of water and nutrients.
Related: Even though Dutch bucket hydroponics uses tubes and emitters to deliver nutrient solution to each plant. The better solution for medium to large scale gardens is the traditional drip irrigation hydroponic system, where grow trays are used to hold several plants in a smaller space. Find out how to build a simple DIY hydroponic drip system.
Water Reservoir
Proper management of the water reservoir is crucial for a successful Dutch Bucket system. Here are some tips to consider:
- Reservoir Size: A general guideline is to have a reservoir capacity of at least 5-10 times the total volume of your Dutch Buckets. For example, if you’re using five 5-gallon buckets, consider a reservoir tank of 25 to 50 gallons. This ensures an adequate supply of water and nutrients for your plants.
- Water Quality: Regularly check the water’s pH and nutrient levels, adjusting them as needed to support healthy plant growth. A pH between 5.5 and 6.5 is ideal for most hydroponic systems.
- Reservoir Pump: Use a water pump with enough power to circulate the water at the desired rate. For example, a pump rated for 200 gallons per hour (GPH) is suitable for a 50-gallon reservoir tank.
By understanding the basics of Dutch Bucket system hydroponics, you can set yourself up for a successful and productive growing experience. Remember to regularly monitor and maintain your system’s components, including the water reservoir, drip system, and drainage paths. With proper care, your Dutch Bucket system will provide bountiful harvests and an enjoyable gardening experience.
Dutch Bucket Vs DWC
When comparing Dutch Bucket Systems and Deep Water Culture (DWC), there are key differences in their designs and functionality. You should be aware of these differences to determine which system is better suited for your hydroponic project.
Dutch Bucket Systems are actually a form of ebb and flow hydroponics. They utilize a series of buckets filled with growing media, coupled with irrigation channels that deliver nutrients and water to your plants in a timed watering schedule. They are designed for recirculating hydroponics, promoting efficient water use. The spent water is drained out after a watering cycle is over. Dutch buckets are particularly suited for larger plants and those with substantial root systems, such as tomatoes.
On the other hand, DWC systems rely on trays or containers filled with nutrient-enriched water, where plants are suspended with their roots submerged directly in the solution. Air stones integrated into the DWC system provide essential oxygen to the plants’ roots, ensuring healthy growth. DWC is ideal for growing smaller, fast-growing plants like lettuce or herbs.
Related: Learn more about deep water culture systems and their components in our extensive guide.
Some key points to consider:
- You will find Dutch Bucket systems better suited for large plants and plants with extensive root systems.
- DWC systems work well for small, fast-growing plants.
- Dutch Bucket systems utilize growing media, while DWC systems have plants submerged directly in nutrient water. Grow media may still be used but only to anchor the plants.
- Only DWC systems need an air pump and air stones to aerate the roots.
- Both systems can be used to grow a variety of plants, including vegetables, fruits, and flowers.
Keep in mind that your choice depends on various factors like the plants you’re growing, their growth stages, and your hydroponic experience. Comparing Dutch Bucket systems to DWC systems will help you decide upon the best hydroponic solution for your specific needs.
Note, that the recirculating deep water system is more similar than the traditional floating raft method to the Dutch bucket system. The RDWC setup also uses multiple grow buckets and a separate main reservoir but the nutrient-rich water is fed directly into each bucket that contains air stones. In Dutch bucket hydroponics, the water is fed from the top and into the grow media where the plant roots are growing. There is no need for air stones here.
The Bato bucket method looks a lot like 5-gallon bucket hydroponics, but the 5-gallon method requires an air pump, as it is a form of DWC hydroponics, whereas there are no air stones in Bato buckets.
Related: Read about recirculating DWC Vs DWC systems here.
How To Build A Dutch Bucket Hydroponic System
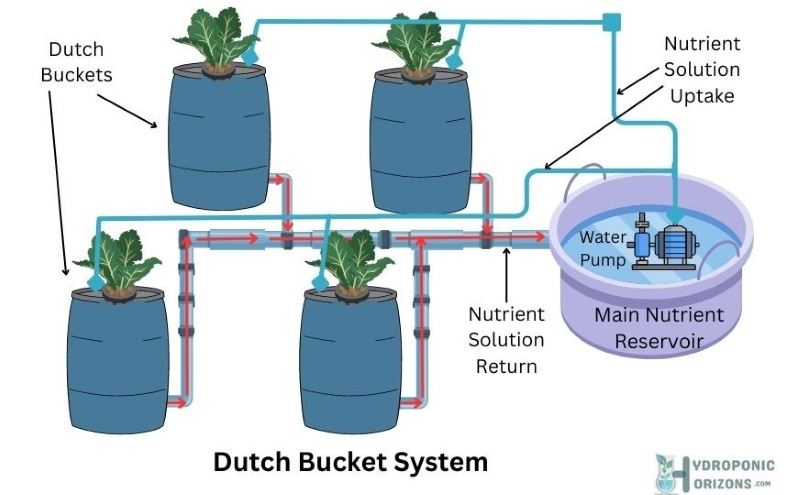
DIY Dutch Bucket System
A Dutch Bucket System, also known as a Bato bucket system, is an efficient hydroponic setup that allows you to grow large and long-term plants. While you can buy a complete kit with all the necessary components, it can be a costly affair. In this section, we’ll help you build your own homemade Dutch bucket recirculating drip system using simple and affordable materials and tools.
Materials Required
To build your Dutch bucket hydroponic system, you will need the following items:
- Four Dutch buckets (can use more if you want)
- PVC pipe (about 8 feet or the length of the table that the Dutch buckets are lined up on)
- Drip emitters
- Pump (submersible pump recommended)
- Growing medium (perlite, vermiculite, expanded clay, or coco coir)
- Drip irrigation system components
Assembling the System
- Select a location: Choose a table, platform, or even just a spot on the floor to build your Dutch bucket system.
- Create a drainage pipe: Cut your PVC pipe to about 8 feet long and lay it down in your designated area. This will be the backbone of your system.
- Position the buckets: Place the Dutch buckets on either side of the PVC drainage pipe. Ensure proper spacing by marking the placement of the drains for each bucket on the drain line.
- Install the drip irrigation system: Set up your drip irrigation system with drip emitters for each bucket. Emitters should be placed above each bucket to distribute nutrient-rich water evenly. Connect the system with the submersible pump.
- Add the growing medium: Fill each bucket with the growing medium of your choice (perlite, vermiculite, expanded clay, or coco coir).
- Plant your crops: Place your plants in the buckets, ensuring that the roots are well embedded in the growing medium.
- Set up the water pump: Connect the submersible pump to the water reservoir, and the other end to the drip irrigation system. The pump will move water through the system, irrigating the plants and allowing excess water to flow back into the reservoir.
- Test the system: Turn on the pump, and the water should flow through the drip emitters, into the buckets, and drain through gravity back into the reservoir via the drainage pipe.
Remember to maintain proper nutrient levels in the water reservoir and to regularly monitor the system for any leaks or issues. With consistent care and attention, you will be able to grow healthy and vibrant plants using your very own Dutch bucket grow system.
Selecting Appropriate Plants
When choosing plants for your Bato Bucket hydroponic system, it’s essential to consider which ones will thrive in this environment. Here’s a list of suitable plants to grow in your system:
- Tomatoes: A popular choice for hydroponics, tomatoes grow well in Dutch Bucket systems, providing high yields and adapting well to this growing method.
- Peppers: Like tomatoes, peppers are another favorite in hydroponic systems. Bell peppers and other varieties can be easily grown with plenty of space for their roots.
- Cucumbers: These versatile vegetables are a great addition to your Dutch Bucket system. They grow well in hydroponics and will provide a bountiful harvest.
- Beans and pole beans: Beans are another excellent crop to grow in Dutch Buckets. Pole beans require a trellis or support system for optimal growth, but they can thrive in this type of hydroponic setup.
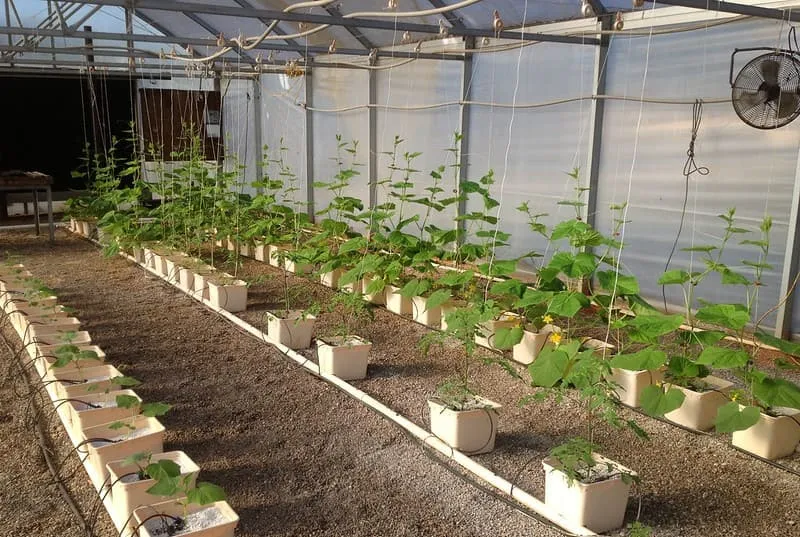
Some other suitable vegetables, fruits, and herbs for Dutch Bucket hydroponics include:
- Eggplant: Be sure to give yourself at least 4 sq. ft. per plant when growing eggplants, with two plants per bucket.
- Lettuce: A fast-growing salad staple that is a fantastic choice for hydroponics.
- Herbs: Basil, parsley, and cilantro are just a few herbs that can successfully grow in a Dutch Bucket system.
- Flowers: Dutch Buckets can also be an ideal environment for growing flowers, such as marigolds and petunias.
With a Dutch Bucket system, you can also experiment growing fruits like strawberries and even some dwarf fruit tree varieties, such as pears. When choosing your plants, remember to consider their individual growth requirements, such as sunlight and temperature, to ensure their success in your hydroponic setup. By selecting the right plants for your Dutch Bucket system, you can enjoy a flourishing and productive indoor gardening experience.
Growing Medium Options
Alternatives to Soil for Hydroponics
In a Dutch bucket setup, the traditional soil is replaced with an alternative growing medium. This medium provides support to the plants and helps to hold water and nutrients essential for their growth. Let’s explore some of the popular growing mediums you can use in your Dutch Bucket System:
- Perlite: This lightweight, porous material is made from volcanic rock. Its high air-to-water ratio ensures that your plants’ roots receive the perfect balance of oxygen and moisture. Perlite is an excellent choice for hydroponic systems as it promotes root growth and prevents root rot. It is one of the cheapest mediums you can use.
- Vermiculite: Similar to perlite, vermiculite is a mineral-based medium with a high water-holding capacity. It is often used to improve soil structure, but also works well in hydroponic systems. Vermiculite provides the necessary buffer of nutrients and water while allowing sufficient airflow for root growth.
- Expanded Clay: Also known as Hydrokorrels, these small clay pellets are kiln-fired, causing them to expand. The result is a highly porous and lightweight medium perfect for hydroponic systems. Expanded clay provides excellent drainage and root support for your plants. This is an expensive option but great if you’re just starting out in hydroponics and want a foolproof medium while learning.
- Coco Coir: Derived from the fibers of coconut husks, coco coir is an eco-friendly and sustainable growing medium. It has excellent water-holding capacity, allowing your plants to stay hydrated for longer periods. Coco coir is perfect for hydroponic systems, as it provides excellent aeration and promotes strong root growth.
To determine the best growing medium for your Dutch Bucket system, consider the specific needs of the plants you plan to grow. Each medium has its advantages and can be tailored to suit the particular requirements of your chosen crop. By selecting the right growing medium, you’ll help ensure the success of your hydroponic gardening endeavors.
Nutrient Management and Delivery
Optimizing Nutrient Solution
To achieve the best results in your Dutch Bucket hydroponic system, it’s essential to optimize the nutrient solution. Begin by selecting a high-quality, water-soluble nutrient mix suitable for hydroponic systems. The nutrient mix should contain all necessary macro and micronutrients to support plant growth.
Measure and maintain the pH level of your nutrient solution between 5.5 and 6.5, as this range facilitates optimal nutrient absorption by the plants. Regularly check the electrical conductivity (EC) of the solution to ensure an adequate nutrient concentration and replace the nutrient solution in the central reservoir every 1-2 weeks.
Irrigation and Circulation
Irrigation and circulation are crucial components in the Dutch Bucket method. Two popular methods for nutrient delivery are flow-to-waste irrigation and drip irrigation. Flow-to-waste irrigation allows the nutrient solution to flow through the growing medium and then drain out without recirculation, while drip irrigation delivers the nutrient solution via drip emitters directly to each bucket.
When using drip emitters, place one emitter in each bucket and adjust the flow rate to ensure each plant receives an appropriate amount of nutrient solution. Keep in mind that the flow rate will vary based on factors such as plant size, growing medium, and growing environment.
Install a submersible pump in your central reservoir to circulate the nutrient solution and deliver it to each bucket. Set the pump to run on a timer, providing regular intervals of watering throughout the day.
Considerations for irrigation and circulation:
- Adjust the flow rate of drip emitters based on plant needs
- Use a timer for consistent delivery and circulation
- Have proper drainage in place, utilizing a drain line to collect excess nutrient solution
By ensuring optimal nutrient delivery and circulation, your Dutch bucket hydroponics setup will support healthy plant growth and development, leading to increased yields and vibrant produce.
Support and Pest Management
Structures for Vine Plants and Fruits
When you grow vine plants like cucumbers using the Dutch bucket method, providing proper support structures is essential. You can opt for a trellis system, which is highly effective in supporting indeterminate plants like tomatoes and cucumbers. Setting up a trellis system will elevate the plants, ensuring they receive adequate sunlight and airflow, thereby promoting healthy growth.
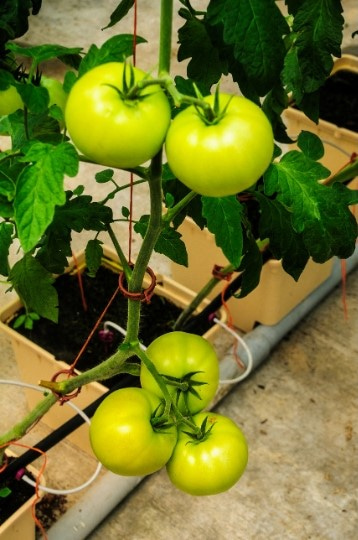
Installing a trellis is simple. Start by attaching vertical support poles at regular intervals along your row of buckets. Next, run horizontal wires between the poles at varying heights. As your plants grow, guide them onto the wires to train them upwards.
For determinate plants such as bush tomatoes and certain types of peppers, you can use stakes or cages for support. These structures will help manage their growth, encourage healthier yields, and assist in pest control.
Controlling Pests and Diseases
To maintain a healthy and productive Dutch bucket hydroponic system, it’s crucial to manage pests and diseases effectively. Here are some tips to help you achieve that:
- Monitor: Regularly check your plants for pests and diseases. This will allow you to detect and treat any issues early on.
- Prevention: Keep your growing area clean and sanitized. Remove any debris or dead leaves, and disinfect your buckets between crops. This helps prevent diseases from spreading.
- Air circulation: Good air circulation is vital for minimizing disease risks, as it helps prevent the development of fungus and mold. Ensure adequate spacing between plants and install fans if necessary.
- Pest management: Use integrated pest management strategies, such as introducing beneficial insects like ladybugs to control aphids and other pests. You can also apply non-toxic insecticidal soaps or neem oil to deal with infestations.
- Gravity-based draining: An essential feature of the Dutch bucket method is the gravity-based draining system, which involves connecting a siphon to the buckets. This setup helps reduce the risk of root diseases, as it prevents overwatering and promotes better oxygenation of the root zone.
Remember, prevention is better than cure, so always keep an eye on your plants and take action quickly if you see signs of pests or diseases. By following these guidelines on structuring and pest management, you’ll be on your way to a thriving Dutch bucket hydroponic garden.
Maintenance and Harvesting
Cleaning and System Care
Taking care of your Dutch Bucket hydroponic system requires regular cleaning and maintenance. First, make sure to clean the buckets with water and a mild detergent to remove any dirt or debris before starting. This also applies when you’re changing crops or after harvesting. Replace your growing medium as needed, especially if you choose something other than a reusable medium like Hydroton balls.
Keep an eye on your reservoir levels, as maintaining proper nutrient concentrations and pH levels is crucial for the health of your plants. Check the nutrient solution’s pH and EC (electrical conductivity) levels at least once a week, adjusting as needed to keep your plants in optimal growing conditions.
Ensure your drain lines remain clear and free from debris. Regularly inspect and clean the lines to prevent clogs, which could lead to over- or under-watering of your plants.
Collecting Produce
When it’s time to harvest your plants, make sure they are ripe and ready for use. Keep an eye on the color, size, and firmness of your fruits and vegetables, as this can indicate readiness for harvest.
In hydroponic systems like the Dutch bucket system, large plants such as tomatoes might require extra support to prevent damage during harvest. You can use stakes or trellises to provide additional support for the plants as they grow.
Harvesting your plants in a timely manner can lead to a bountiful harvest and make room for new growth. With proper maintenance and care, your Dutch bucket hydro system can provide you with fresh, eco-friendly produce in both large and small spaces, making it perfect for anyone looking to embark on a hydroponic gardening journey.
Dutch Bucket System Pros And Cons
The Dutch bucket method is known for its versatility, space-saving features, and suitability for various plant types. Let’s dive into the pros and cons of the Dutch bucket hydroponics system.
Pros:
- Versatility: One of the primary advantages of the Dutch bucket system is its adaptability. You can grow different plant types, including large fruiting plants, within the same setup. It caters to both hobbyists and small-scale commercial growers.
- Space-saving: The Dutch bucket system allows you to arrange plants in a compact manner by using a shelf layout. As a result, you can optimize your available space, making it an excellent choice for small greenhouses or indoor gardens.
- Scalability: Expanding your hydroponic garden is simple with the Dutch bucket method. All you need to do is add another bucket to your setup, making it an attractive option for those who want to scale up their operations progressively.
- Control over growth medium: Unlike other hydroponic systems that use a shared medium bed, the Dutch bucket system allows you to choose the growth medium for each individual bucket. This enables you to precisely cater to each plant’s needs and preferences.
Cons:
- Labor-intensive setup: The initial installation of a Dutch bucket system can be more tedious compared to other hydroponic methods. You’ll need to drill holes, attach net pots, and set up drainage and irrigation systems for each bucket.
- Possible root competition: If you overcrowd your buckets, the plants may compete for nutrients and root space. To avoid this issue, make sure to space your plants appropriately and monitor their growth closely.
- Increased monitoring and maintenance: With individual growth mediums and separate buckets, you’ll need to keep a closer eye on each plant’s nutrient and water requirements. This might increase the time you invest in maintaining your hydroponic system.
The Dutch bucket system has several pros and cons, making it an excellent choice for certain growers while presenting challenges to others. Considering these factors will help you determine if this hydroponic method is the right fit for your gardening needs.

