Hydroponic gardening has become increasingly popular as more people are looking for innovative ways to grow plants indoors or in limited spaces. One highly versatile and efficient method for hydroponic gardening enthusiasts is the hydroponic drip system. This system delivers nutrient-rich water directly to the roots of your plants, ensuring optimal growth and health without the need for soil.
Setting up a hydroponic drip system DIY can be an exciting and rewarding project for both beginners and experienced gardeners alike. In this article, we will explore how to build your own drip system at home, the parts you need, and provide tips on maintaining your hydroponic garden for optimal results. Get ready to create a thriving, soil-free oasis that will leave your plants happy and flourishing.
Fundamentals of Hydroponic Drip Systems
A hydroponic drip system is a popular and efficient method for growing plants without soil. It provides a consistent supply of water and nutrients directly to the plant roots, ensuring optimal growth conditions. This friendly guide on drip method hydroponics will help you understand the basic components of a hydroponic drip system and guide you on how to set one up for yourself.
Components of a hydroponic drip system
A typical hydroponic drip system includes the following elements:
- A reservoir to hold the nutrient solution
- A water pump to circulate the nutrient solution
- Drip lines and emitters to deliver the solution to the plants
- A growing medium to anchor the plants
- A support structure to hold the plants and growing medium
Setting up your hydroponic drip system
- Choose a growing medium: Select a suitable growing medium for your plants, such as perlite, coco coir, or rockwool. The medium should provide good water retention and aeration for healthy root development.
- Prepare the reservoir: Fill your reservoir with water and add the appropriate hydroponic nutrients. Make sure to pH balance the solution to ensure proper nutrient absorption.
- Assemble the drip system: Install the water pump in the reservoir and connect it to the main drip line. Attach the drip emitters and ensure they are evenly spaced above each plant site.
- Add your plants: Carefully transplant your seedlings or young plants into the growing medium. Make sure they are secure and have proper spacing to grow and thrive.
- Monitor and maintain: Regularly check the nutrient solution levels in the reservoir and adjust as needed. Also, clean the drip emitters occasionally to prevent clogs, and keep an eye on your plants for any signs of nutrient deficiencies or pest issues.
Components of a DIY Drip System
Building a DIY hydroponic drip system can be a rewarding endeavor. Assembling the various components and watching them work together to produce healthy plants is an exciting experience. In this section, we’ll discuss some of the most essential parts of your hydroponic drip system.
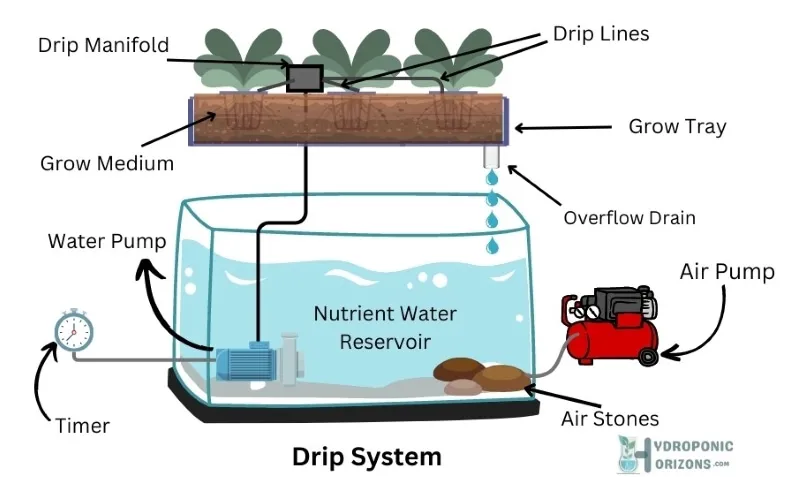
Reservoir: It all starts with the reservoir, where the nutrient solution is stored. You’ll need a container large enough to store the water and nutrients needed to feed your plants.
Nutrient Solution: Your plants will rely on this solution for all their nutritional needs. It’s essential to choose the right nutrients and mix them at the correct ratio. There are many options available, so do your research to find the best choice for your plants.
Timer and Water Pump: An essential piece of equipment is the timer, which controls how often the nutrient solution flows through your system. A drip hydroponic system watering schedule is a must. Along with the timer, you’ll need a water pump to move the solution from the reservoir to the plants—submersible pumps work great for this purpose.
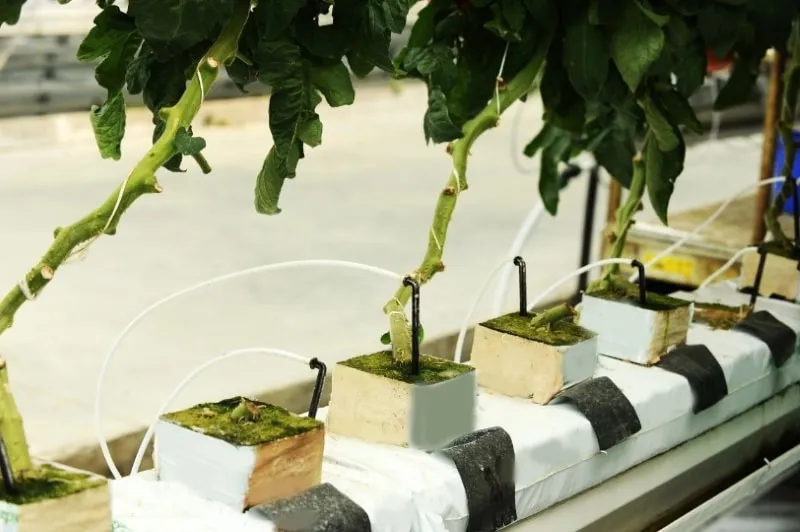
Tubing and Drip Emitters: To get the nutrient solution to your plants, you’ll need tubing and drip emitters. Tubing connects the pump to individual drip emitters placed near each plant. This ensures that the nutrient solution reaches every plant in your system.
Air Stone and Air Pump: Oxygen is crucial to healthy plant growth. An air stone and pump will help oxygenate the nutrient solution, improving the environment for your plants’ roots.
Growing Medium: While there is no soil in a hydroponic system, a growing medium is still required to anchor the plants in place. Options include perlite, vermiculite, coconut coir, and rockwool. Be sure to choose the best medium for your specific plants and environment.
How To Make A Hydroponic Drip System
Building your own hydroponic drip system for your garden can be an exciting and rewarding project. It’s a great way to maintain ideal nutrient levels and oxygen supply for your plants, while also minimizing the risks of algae and bacteria buildup. With a few tips and guidance, you’ll be on your way to creating an efficient and productive hydroponic garden.
To begin, you’ll need to gather the necessary components for your hydroponic drip system. This includes a reservoir, water pump, tubing, drip emitters, and a growing medium (such as coconut coir or perlite). You will also need to decide on the type of plants you wish to grow as this will determine the size and layout of your system.
Next, prepare your growing medium by rinsing it thoroughly to remove any dust or debris. This is crucial for maintaining a clean environment in your hydroponic garden and preventing unwanted growth of algae or bacteria. Once your medium is prepared, place it into your planting containers, making sure it’s evenly distributed.
Now it’s time to set up your irrigation system. Start by connecting your water pump to the tubing and attaching the drip emitters at the desired locations. Be sure to space them evenly to ensure that all of your plants receive equal access to the nutrient solution. Then, place each emitter on top of the growing medium to allow for proper water distribution.
After you’ve set up your irrigation system, it’s essential to test it before adding your plants. Place the pump inside the reservoir filled with plain water. Connect it to a timer that will turn the pump on and off. Activate the pump and check for any leaks or clogs in the tubing and emitters. Make any necessary adjustments to achieve a consistent drip rate for your plants’ needs. This is especially important, as you want to make sure they receive adequate oxygen and nutrients.
With your irrigation system in good working order, it’s time to prepare the nutrient solution for your hydroponic garden. Carefully mix the appropriate nutrients based on your plants’ needs and fill the reservoir. Be sure to monitor nutrient levels regularly to ensure optimal growth and health of your plants.
Finally, add your containers of seedlings or cuttings to the growing medium and activate your hydroponic drip system. As your plants grow, keep an eye on their progress and adjust the drip rate, nutrient levels, and layout as needed. With your new hydroponic drip system in place, you’ll enjoy a fruitful and thriving garden.
If you want to grow a few different crops using the same reservoir or want to minimize disease spread between plants, you have the option of using a Dutch bucket system. In this system, each plant is grown in its own container while the nutrient solution flows via tubes to each of them. The excess solution is drained and recirculated back to the reservoir using separate tubes. This system is especially useful for growing larger crops like shrubs but it is difficult to scale compared to a traditional hydroponic drip setup.
Maintaining the Ideal Environment
Creating a comfortable and healthy environment is essential for your hydroponic drip system. To help achieve this, let’s discuss temperature, humidity, and air circulation, as well as some tips on preventing diseases in your plants.
First, it’s important to maintain an ideal temperature for your plants. Generally, you should aim for a temperature range of 68 to 75 degrees Fahrenheit during the day and slightly lower at night. If your plants are housed in a greenhouse, be sure to closely monitor the temperature to ensure it stays within this range.
Humidity is another critical factor for plant growth. Aim for a relative humidity of 40-70% for most plants. If humidity is too high, it could lead to diseases like mold and mildew. To control humidity in your greenhouse, you can use a dehumidifier or exhaust fan, while a humidifier can be used to increase humidity if it’s too low.
To ensure proper air circulation in your hydroponic drip system design, consider using an air pump and air stones. These will help to oxygenate the nutrient solution and distribute it evenly to your plants. Good air circulation will also help keep diseases at bay.
Take care to regularly clean and sterilize your equipment will help prevent the spread of diseases. Be sure to change the nutrient solution at least once every two weeks to maintain optimal nutrient levels and reduce the risk of diseases.
Keep an eye out for any signs of disease in your plants, such as yellowing leaves, stunted growth, or wilting. If you spot any issues, taking immediate action is crucial. Remove any affected plants to prevent the spread of disease, and take a moment to evaluate your system for potential issues like poor water quality or inadequate air circulation.
Supplemental Lighting and Techniques
Friendly lighting is an essential part of a successful hydroponic drip system. Provide your plants with adequate supplemental lighting to ensure optimal growth and health.
First, consider using LED grow lights as they are energy-efficient and have a longer lifespan compared to traditional grow lights. LED lights are available in a range of spectral outputs, allowing you to customize your lighting to suit the specific needs of your plants. Make sure to research the specific light requirements of the plants you’re growing to determine the optimal color spectrum and intensity.
When setting up your supplemental lighting, keep several factors in mind. Hang your lights at an appropriate height above your plants, taking care not to place them too close, as this can cause heat stress and damage. Similarly, placing lights too far away will reduce their effectiveness.
It’s essential to provide a consistent light schedule, allowing your plants to experience a regular day-night cycle. Use a timer to regulate your lights, ensuring that your plants receive the correct amount of light exposure for their growth stage. This typically ranges from 16 to 18 hours of light for vegetative growth, followed by 12 to 14 hours for the flowering stage. Be sure to adjust the cycle accordingly to maximize your plants’ potential.
Additionally, consider implementing reflection techniques to make the most of your light source. This can involve using reflective materials like Mylar or white plastic on the walls around your growing area, ensuring that the light is evenly distributed and reaches all of your plants.
Remember: providing proper lighting for your hydroponic drip system will make a significant difference in the overall success of your indoor garden.
Cost-Effective DIY Hydroponic Solutions
If you’re interested in creating a homemade drip system, there are several cost-effective options for you to explore. These DIY hydroponic systems can help you grow plants more efficiently, using nutrient solutions and soil-free methods.
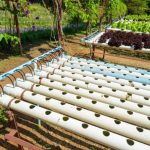
One popular option to consider is a drip irrigation system with PVS pipes instead of large grow trays. This method involves using PVC pipes and a hydroponic drip manifold or drip ring to distribute nutrient-rich water to your plants through a series of drip emitters. This device connects to your water pump and splits the feed into multiple drip lines. Choose a manifold with adjustable flow control to ensure optimum delivery of nutrient solution to each plant, based on their individual needs.
Drip systems can be customized to fit your specific needs, and you won’t need a significant investment in equipment. You can even repurpose PVC pipes and other materials from around your house.
To start, you’ll need net cups for holding your plants, a water pump, PVC pipes, a manifold, and a reservoir to hold the nutrient solution. Begin by placing your plants in net cups and arranging them within the PVC pipe structure. Next, connect the manifold to the water pump and attach irrigation tubing to the manifold. Thread the tubing through the holes in your PVC pipes, ensuring water can drip onto the plants’ roots.
When it comes to nutrient solutions, you have the option to purchase pre-formulated options or create your own. Just ensure the solution you choose provides essential nutrients required for plant growth, such as nitrogen, phosphorus, potassium, and micronutrients.
Advanced Hydroponic Drip System Design Techniques
In this section, we’ll discuss some advanced techniques for a hydroponic drip system that’ll help you achieve a highly efficient and cost-effective setup. These methods involve careful planning, precision, and utilization of both circulating and non-circulating systems.
A recovery system, also known as a recirculating drip system, is an excellent option for conserving water and nutrients. In this setup, any excess nutrient solution that isn’t absorbed by your plants is collected and returned to the nutrient reservoir for reuse. This not only saves water but also reduces the overall cost of nutrients. The excess water can be captured directly by the reservoir if it is placed underneath the grow tray.
On the other hand, a non-circulating system doesn’t involve the return of unused nutrient solutions. Here, you need to ensure that the precise amount of nutrient solution is provided to each plant, minimizing any wastage. Precision in such systems involves close monitoring of plants and adjusting the drip frequencies and amounts accordingly.

